How to create a SmartSuite Plugin for Bubble
A step by step overview of building a SmartSuite plugin for Bubble
Hey friends 👋🏿,
Today we’re diving into data integrations with Bubble and building a SmartSuite plugin for Bubble. SmartSuite is a collaborative work management platform, and Bubble offers a no-code environment for web applications.
Integrating SmartSuite's database with Bubble's no-code tools unlocks the potential for custom portals and task management, all powered by a user-friendly database accessible to even the least technical users.
What we’ll build
There are a variety of ways to build data integrations for Bubble. In this tutorial, we’ll focus on a server-side plugin action that fetches new records from SmartSuite on request.
To follow along you’ll need
Bubble account and a Bubble app that you’d like to use to test with the plugin
a SmartSuite API Key and Workspace ID
Find the Table ID for SmartSuite by looking at the second ID in the table URL you want to use.
Some familiarity with Bubble plugins is helpful. If you're new to this, check out this guide.
1. Set up the plugin
Once logged in, head to Bubble’s ”Plugins” tab, choose “Create a plugin”, give it a name, and then click “Create plugin”.
Fill out plugin details in the “General” tab
In the “Shared” tab, add two additional keys: “API Key'” and “Workspace Id”. These fields will allow users to input their own SmartSuite credentials. Make sure to mark these keys as “private”.
2. Build the action to return the expected data format
To enable Bubble to read and display our data, we need to inform Bubble about the data type and fields. This action provides the first table record as an example for users to import. To set it up, create a new action and configure the following settings.
Name: “SmartSuite - Fetch Table Structure” (You can use any name. It’s for identification within Bubble workflows, so make it descriptive).
Action Type: Server Side
Field: "tableId" with a type of "dynamic value" and "text" data type.
Returned Value: "tableFormat" with a type of "text.
In the action code, format the SmartSuite API call, set up authentication headers, and filter for the first record. Here's the complete code for this task.
async function(properties, context) {
   const apiKey = context.keys["API Key"];
   const workspaceId = context.keys["Workspace Id"];

   const url = `https://app.smartsuite.com/api/v1/applications/${properties.tableId}/records/list/`;
   const options = {
       method: 'POST',
       headers: {
           'Authorization': `Token ${apiKey}`,
           'ACCOUNT-ID': workspaceId,
           'Content-Type': 'application/json'
       },
       body: JSON.stringify({
           "sort": [],
           "filter": {}
       })
   };

   try {
       const response = await fetch(url, options);
       if (!response.ok){
           throw new Error(`HTTP error! status: ${response.status}`);
       }

       const responseBody = await response.json();
       const firstItem = responseBody.items && responseBody.items[0] ? JSON.stringify(responseBody.items[0]) : null;

       return {
           tableFormat: firstItem,
       };
   } catch (err) {
       console.error('Error:', err);
       return {
           tableFormat: null,
       };
   }
}
3. Build the action to return records
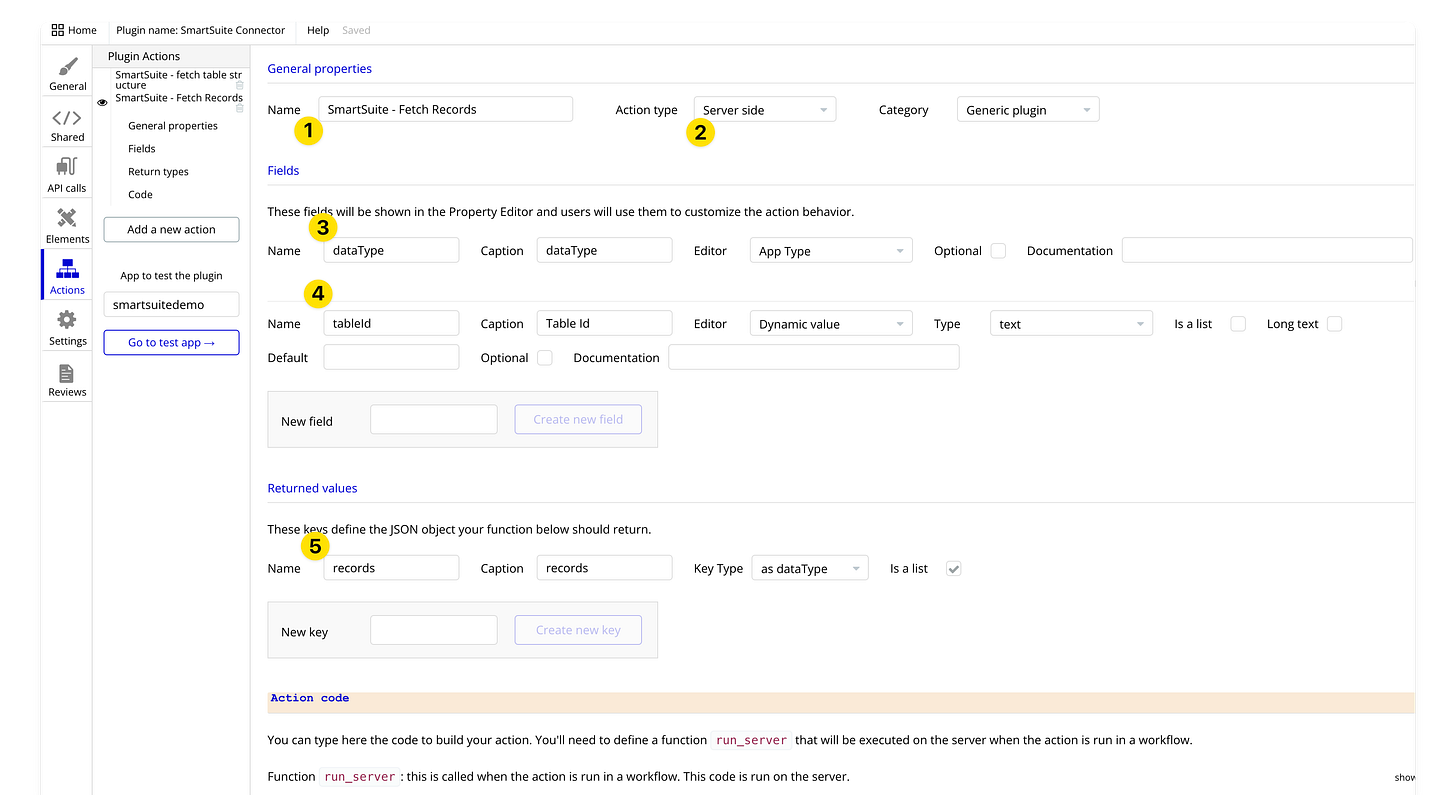
Next, we’ll create the action for grabbing records from SmartSuite, in the actions tab add a new action
Add a new action and configure the following settings:
Name: 'SmartSuite - Fetch Records.'
Action Type: 'Server Side'
Field 1: “dataType” of type “App type” Users will configure this based on the data type they've created in Bubble.
Field 2: “tableId” with a “dynamic value” of type 'text'
Returned Values: 'records' with a type of 'dataType' and mark it as a list.
In this action's code, we'll return the full list from the SmartSuite API. We'll need to format the response for Bubble by prefixing all keys with 'api_c2':link to Full Code Snippet.
For a deeper dive into the process of returning objects, you can find valuable insights in a Bubble forum thread by Jared from Codeless Consultant. Bubble's documentation on prefixes and returning objects from plugins is limited, but Jared's thread offers a fantastic resource on this topic
While the action code provided directly converts the objects, Sergey from Mintflow offers a helpful module for automatically converting objects.
And that's a wrap! For in-depth details on these concepts and ideas on how to build a more robust integration, check out the full guide.
If you try any of these steps, feel free to reach out via email or leave a comment!
Lola


